Showing posts with label Gluten-Free. Show all posts

Saturday, August 16, 2014

Chinese Lion's Head Meatballs

I find it totally fascinating that in general most people across the planet are eating the same things: sandwiches, fried dough, bread, stew, sausagemeatballs... It's not surprising - since our ancestors learned how to farm and cook grains, it wasn't a far jump to begin milling the grains to produce dough that could be baked into bread, fried, or used to make things like noodles, dumplings, or pie. Bready concoctions provided a cheap vehicle for all other foods in the form of sandwiches, wraps, pizzas, etc. Stew is the ultimate one-pot-cookery. Every culture has some form of "put everything in a pot and let it cook until it's done". Stew is simply an efficient way to make do with whatever you have. Sausage and meatballs are a method for making delicious use of cheap and otherwise unexciting or unappetizing parts of the animal.

Meatballs made of entirely pork seem to be surprisingly uncommon. Rather, ground pork is frequently used across the globe as an additive to increase the deliciousness of other meats. Pork fat is especially sought after for it's excellent ability to add moisture to leaner meats. (The sensation of "moist" or "succulent" food usually comes from fat, not water). Anyway, the Chinese don't shy away from pork. A popular meatball in eastern China (particularly Shanghai) is known as the Lion's Head (the meatball is the head, and the bed of cabbage it's served on is the mane). According to Wikipedia, Lion's Head meatballs can be up to 10cm in diameter!

Lion's Head Meatballs
1# Ground Pork
~1 tsp Fresh Ginger, minced
1 1/2 Tbsp Cornstarch
1 Tbsp Water
2 tsp Soy Sauce
pinch salt
(add 2-3 eggs to make these fluffier)
(chopped mushrooms are also a common addition)
....
oil for frying
...
1 head Bok Choi or Napa Cabbage
Mirin
Stock
More Soy Sauce
(optional garlic)
...
Green Onion for garnish


Put pork, minced ginger, and salt into a large bowl. In a second bowl, stir together the cornstarch, water, and soy sauce until it's a smooth slurry - add this to the bowl with the pork in it. Thoroughly mix together and use your hands to form whatever size meatballs you want - I made roughly walnut-sized balls. To avoid an impossibly sticky mess on your hands - wet your hands with water before diving in to form meatballs. 


I think it's easiest to form all the balls, then wash your hands and start frying. Otherwise you could risk getting pork everywhere or burning your balls while you're trying to wash the pork off your hands. Alternatively, if you don't like cooking with your hands - you can use an ice cream scoop or spoons to make each ball.

Heat up some peanut oil (or sesame, or grapeseed, or canola) in a wok or heavy-bottomed pan on medium to low heat. Meanwhile, get some rice cooking!


When the oil is hot - add your balls! You should have enough oil to come at least half-way up each ball.


Don't touch the meatballs immediately after you put them in the frying oil! They will likely be stuck to the bottom, but if you give them a minute, they will unstick themselves. Whereas in my experience, if you try to unstick them right away, they will inevitably turn into a sticky mess. Let the meatballs fry for a few minutes until browned on the bottom and then turn them over and fry until they are nicely browned all over.


Move browned meatballs from the frying oil onto a paper towel to let the excess oil drain off.


Prepare the mane of the lion: Chop up some bok choi or cabbage and use it to line a large pan.


Drizzle maybe a 1/2 cup of mirin, 1/2 cup of stock, and a few Tbsp of soy sauce over to the bok choi. I also added some sliced garlic (fresh ginger also would have been good!). Place the fried meatballs on top and let simmer for about 20 minutes until the bok choi is wilted and tender. Season with salt.


Serve with rice and fresh green onions.


References:
Two Red Bowls
The Thousand Recipe Chinese Cookbook

Tuesday, June 10, 2014

Grill-Baked Double Chocolate Idiot Cake

My dad LOVES chocolate. Intense, bitter, extreme dark chocolate. So for his birthday I wanted to make him something extremely chocolately. Except I had a slight problem - our oven is on the fritz, so baking is out of the question... or is it?! One does not necessarily need an oven to bake. Humans were baking long before the conventional oven was invented, and even now some of us humans continue to bake over open flame and hot coals. 

I've never baked a cake on a grill before, so I searched the interwebs for a fool-proof chocolate cake recipe and decided on David Lebovitz's Chocolate Idiot Cake. This recipe claims to be idiot proof, which I thoroughly tested and confirmed. It's so simple, it only has four ingredients:

10 oz. Bittersweet Chocolate
7 oz. Unsalted Butter
5 large Eggs
1 cup Sugar

Get all the ingredients together and light up the grill.


Prepare a 9-inch spring-form pan by buttering it and then dusting it with cocoa powder. 


Wrap the pan in a single sheet of foil to protect the cake from the water-bath that it will ultimately be cooked in (this isn't necessary if you are not using a springform pan). 


My foil wasn't large enough to cover the entire pan with one piece, so I tried using two pieces. It seemed to work at first, but later on when the cake was nearly finished, I noticed some water hanging out with the cake inside the pan. I panicked. My cake was swimming! It was clearly ruined! ...or was it? I simply dumped the water off the cake and put it back on the grill to dry off a little, finish baking, and in the end it was like nothing happened. After that catastrophe, I was convinced - this recipe really is idiot-proof!

I'm getting ahead of myself... to make the cake, begin by roughly chopping the chocolate into chunks, cut the butter into a few pieces, and then melt the butter and chocolate together in a double boiler. Choose your chocolate carefully as this is the primary flavor of this cake. I used Scharffenberger 99% unsweetened baking chocolate, plus a few Guittard semisweet chocolate chips because I didn't have quite enough Schrffenberger on hand.


Whisk together the eggs and sugar in a large bowl.


When the chocolate is completely melted, whisk it into the eggs and sugar.


Put the batter into the prepped pan and then place the whole thing in a larger pan.


By now the coals should be ready. Divide them onto two sides of the grill like this:


Put the cake on the grill and add water to to the outer pan until it's about half-way up the edge of the cake pan. I also moved our oven thermometer out to the grill to make sure it wasn't getting too hot. The original recipe says to bake at 350F. Surprisingly it remained around 300-350 the entire time.


Either cover the cake with foil, or put a lid on it. Then close the grill and let it bake for about an hour.


Check it every 20-30 minutes, and more frequently once it's getting close to done. It's done when a toothpick or knife can be inserted and cleanly removed from the cake. About 30minutes into baking I added a few pieces of charcoal. ...I also made dinner on the grill while the cake baked. Mmmm whiskey-maple sausage!


 The finished cake wasn't the most glamorous cake I've ever seen...


...but luckily I had some chocolate ganache in my freezer (left over from Chocolate Macarons) that I melted and used as frosting. 


In the end, this cake was INTENSE. Somewhere between a dense mousse and a silky fudge - chocolate perfection.


Monday, March 31, 2014

Carnitas

My good friend Sarah makes the most incredible carnitas I have ever had. Her carnitas are better than any carnitas you will get in a restaurant. No joke. Every time I've ordered carnitas at a restaurant I've been horribly disappointed. I think there's a few reasons for this - (1) Sarah always used Skagit Valley Ranch pork, which, is the best pork you will ever eat. (2) Sarah always used Skagit River Valley Ranch bacon grease, or even sometimes lined the pan with bacon, and (3) Sarah always pan-fried the carnitas just before eating them, to give them even more flavor and delightfully crispy little edges.

Here is a quote from Sarah's blog post about carnitas:
"In Spanish, carnitas translates to "little meats". Little tiny meats dancing upon your corn tortilla. Little tiny meats dancing on your tongue. Carnitas, second only to bacon, are a great blessing from the cloven hoofed pig."

And now, here is how to make the best carnitas you will ever eat:

1) Buy a really excellent pork shoulder and bacon.
(if you're in the Bay Area, I recommend Prather Ranch or Marin Sun Farms ....side note: Marin Sun Farms sometimes has "mystery boxes" containing 15 pounds of high quality meat for $20!!)


2) Line a cast iron pan with bacon, cut the pork shoulder into chunks and put them on top of the bacon


3) Add a couple cups of water to the pan so the pork is mostly covered.


4) Cook it in the oven at 350F for 5-6 hours till the meat falls apart.


That's it. The only ingredients are pork, bacon, and water. If you don't want to use bacon for some reason, you'll want to season the meat with at least salt and probably pepper. In fact, if you're not going to use bacon, I'd encourage you to get creative with spices! (curry carnitas? cuban carnitas? BBQ carnitas?)

During the cooking process, keep an eye on it to make sure the water doesn't evaporate. About half way through cooking, I turned all the meat pieces over and added some more water.


After 5 hours, the meat seems to fall apart at the shear thought of touching it. Take it out of the oven and shred all the meat, pulling it apart into "little meats". Don't worry about the liquid, it will keep everything moist and delicious.


This is when I realized another brilliant thing about Sarah's carnitas. I have no idea what exactly happened to the bacon. It was gone. It liquified into pork-flavored pork seasoning. I chose the fattiest pieces of bacon on purpose for these carnitas, so it's not too surprising if all that fat really did just liquify into delicious pork juice. Mmmmm. Remember folks -- fat is flavor.


So now you have carnitas. What do you do with carnitas? First you should pan fry them, and then the rest is up to you. Though, it's wise to exercise a reasonable amount moderation with these. A little bit goes a long way, and a lot might actually give you a heart attack. A delicious, delicious heart attack.


Carnitas can be eaten alone, in a taco, or a burrito. Carnitas scrambled eggs or panfried with potatoes for breakfast. Carnitas nachos. Carnitas quesadillas. Carnitas everything.


P.S. Sarah just mentioned that she sometimes adds beans to the carnitas water while its cooking to make porky beans.

Tuesday, January 21, 2014

Honey Chocolate Peanut-butter Banana

Another Alex creation. This is a common late night snack for him, long after I've gone to bed. He graciously recreated this midnight ritual during the harsh light of day and he even aloud me to document the entire process. So here it is for your enjoyment and inspiration - Alex's late night goop of marvelous deliciousness!

Forage the wild kitchen for the elusive banana!


Prepare a bowl with several scoops of peanut butter.


...and get some chocolate chips and honey nearby.


Peel the banana while butter melts on the stove, then slice the banana into the butter and fry it.


Gently flip these delicate morsels with a spoon and continue to fry just until they begin to have the slightest amount of color on them.


Transfer the fried banana to the peanut butter bowl and immediately add chocolate chips and honey.


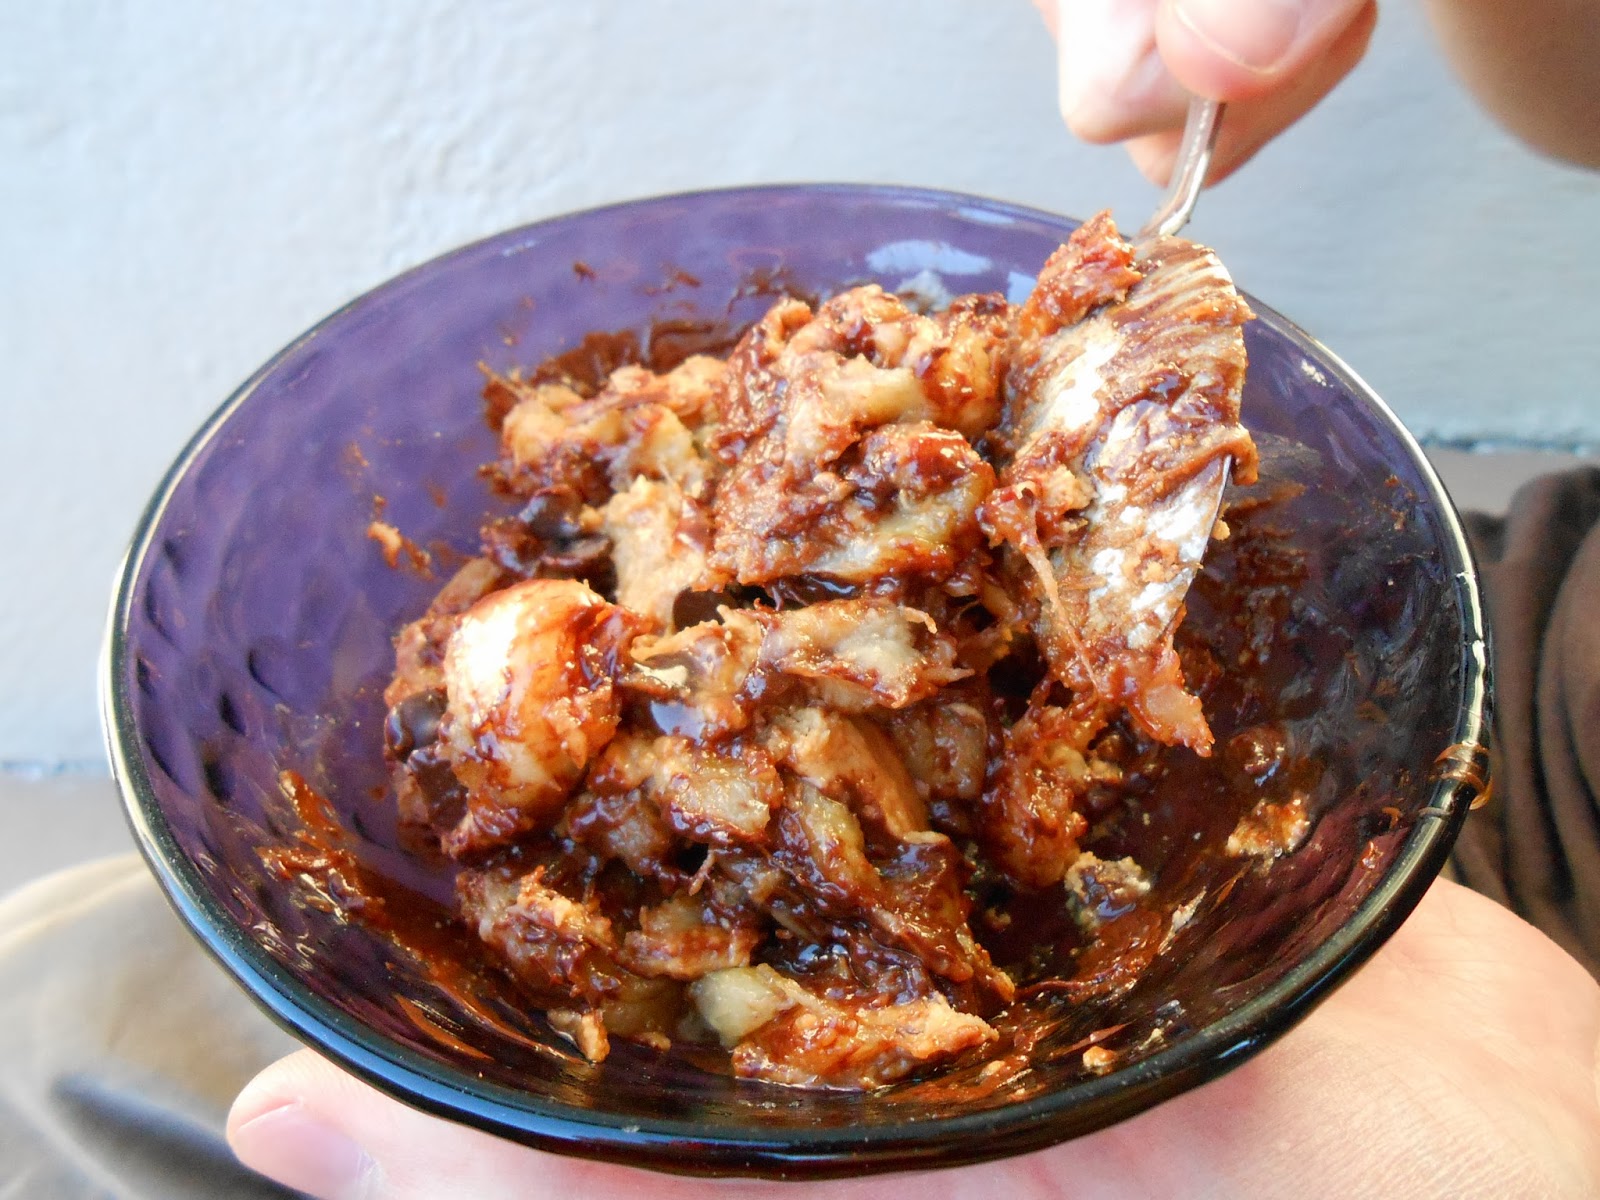
Notice how the chocolate chips melt into the hot fried banana. Mmmmmmm.


The next part is critical, and Alex assured me that any photo would surely be disgusting.


Once the chocolate chips are melted, mix everything together with a spoon, and enjoy.


I think it's actually rather beautiful. A complex landscape of peanut, chocolate, honey, and banana!

Monday, January 20, 2014

Honey Mustard Pork

For the record, here is Alex's honey mustard pork recipe. I believe this recipe is still evolving, but we wont know unless we have a record of it now, to compare to it later. Perhaps one day we will mine the data in this blog to construct a phylogenetic tree that explains the evolution of our recipes and eating habits. But in the mean time - pork!

We had a lonely pork chop in the freezer that Alex used for this, though he would have preferred a Boston Butt, or a similar cut of pork better used for slow cooking.

Brine the pork for 1 hour prior to cooking, though Alex is curious to explore alternatives/longer brining procedures.

Brine
2 Tbsp Salt
2 Tbsp Sugar
1/4 cup Apple Cider Vinegar
Water

Mix together the ingredients for the brine, plus enough water to cover the pork in a baking dish. Let sit in the fridge for an hour.

Take the pork out of the brine and sear it in hot bacon grease in a cast iron skillet. It should be thoroughly seared, a little charred even.

Dump the brine out of the baking dish, place the seared pork back in the dish.
Deglaze the cast iron skillet and caramelize some sliced onions and garlic in the skillet.
Top the pork with the onion/garlic/pan-juices.

In a small bowl or 2-cup measuring cup, prepare the sauce:

Sauce
2 Tbsp Honey
1/4-1/2 cup Coffee, fresh brewed
1/4-1/2 cup Apple Cider Vinegar
1 Tbsp Molasses
at least 1Tbsp+ of Mustard Powder... probably more
a healthy dash of Saigon Cinnamon
sizable pinch of Applewood Smoked Sea Salt
some Crushed Red Pepper Flakes
a healthy amount of Cumin, maybe 1-2 tsp
~1/2 cup Boiling Water

Vigorously stir together all the ingredients for the sauce, then pour it over the onions, garlic, and pork in the baking dish. Cover the dish with foil and bake at 250F for 2 hours.


Remove the pork from the sauce, blend the sauce, then reduce it on the stove until it has a good BBQ sauce like consistency. Alex also made cornbread and I whipped up a coleslaw to make a meal out of it.


The Joy of Cooking has a great cornbread recipe. I make coleslaw a little different every time. My goal is to make it as colorful as possible, here's the gist of it:

Coleslaw
Red Cabbage - very thinly sliced
Carrots - grated
Peppers of every possible color! - grated or thinly sliced
Cilantro - coarsely chopped
Green Onion - sliced
Red Onion - minced (maybe a Tbsp-ish)
Dolup of Mayonnaise
Big splash of Apple Cider Vinegar
Dash Cinnamon
Big dash Paprika
Huge pinch of Salt
...
Additional suggestions for coleslaw:
Kale - thinly sliced/chopped
Beets of any/all colors - grated
Lemon and/or Orange Zest
Apple - diced
Mustard
Herbs! - play with herbs!
Play with Spices too! (Fennel an Cumin come to mind first..)


Tuesday, July 9, 2013

Black Bean Cactus Thing

Several years ago we bought some dried black beans because it makes a lot of sense buy beans dried rather than canned (less processing and all around cheaper). However, dried beans take planning to cook and canned beans are just so darn easy. Anyway, we FINALLY soaked and cooked those black beans we bought years ago. I suppose an added bonus of dried beans is they're incredibly shelf stable.


The beans soaked for 24 hours and then we used them to make a hearty vegetarian dinner of brown rice, black beans, nopales, onions, carrots, garlic, sweet peppers, tomatoes, and cilantro.


First things first, the spines must be cleaned off the nopales.


While I meticulously de-armed the nopales, the pre-soaked black beans and brown rice cooked on the stove. When they were done, I decided to save the cooking water, to used it to flavor something else.


I diced the nopales and sauteed it with onions and garlic. 


Alex added spices (cumin, California paprika, cinnamon, red flake pepper, black pepper)...


..and sweet peppers...


We finished it with tomatoes and cilantro before adding the cooked beans and rice. Some Avocado and green onion would have also been awesome additions.